
'The Bermuda Trail'.
It was created last night when I couldn't sleep.

~20,5cm (~8 in.) bracelet
~140cm (~4.6 ft.) black
~140cm (~4.6 ft.) red
~170cm (~5.6 ft.) goldenrod
It's a thick weave and this 20,5cm bracelet fits my 17,5cm wrist very well.
To prevent the bracelet from shrinking, I recommend to put the cords in boiling hot water for a few minutes.

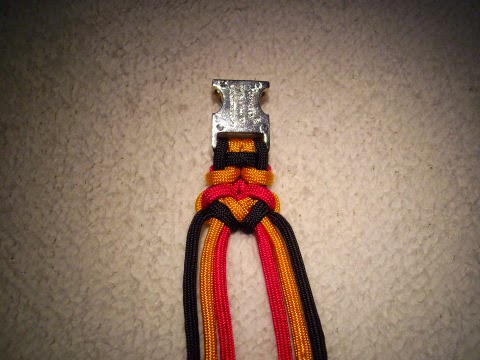
As shown in Knotorial 01, start with a buckle connected to three colors.
Make sure you use the correct cord length and arrange it as shown in the picture.

Step 02:
This weave is tied on the backside of the bracelet.
Use the middle cords to form loops around the outer cords, first behind then over them.
This weave is tied on the backside of the bracelet.
Use the middle cords to form loops around the outer cords, first behind then over them.

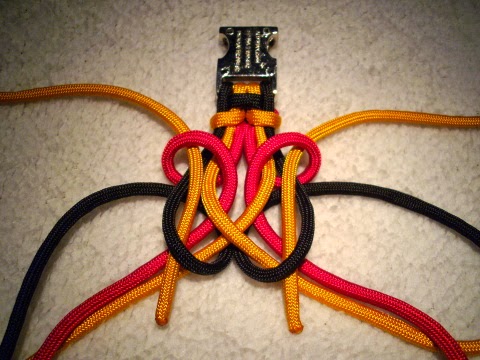
Step 03:
Use the longest strands to form a cross over the inner cords.
Use the longest strands to form a cross over the inner cords.

Step 04:
Use the outer cords to
form loops around the inner
cords on both sides, as shown
in the picture.
Use the outer cords to
form loops around the inner
cords on both sides, as shown
in the picture.
Step 05:
Pull the ends from the longest cords first behind then through both loops on the left and right side.
Pull the ends from the longest cords first behind then through both loops on the left and right side.

Pull the ends from the longest cords all the way through the loops.
Step 06:
Tighten the loops and knots firmly to get a result as shown in the picture.
Tighten the loops and knots firmly to get a result as shown in the picture.


Repeat Step 02 - Step 06 to continue the pattern until you reached the desired bracelet length.
Don't forget to calculate the buckle and the finish for the length.
Don't forget to calculate the buckle and the finish for the length.

To finish the bracelet, turn it to the frontside and form a cross with the outer cords.
Start with the right side and lay the outer cord over the other strands, then behind the cords on the left side.

Repeat Step 07 on the opposite side.

Pull the outer ends through the upper loops from the cross.

Pull the remaining inner cords through the other part of the buckle.

Turn the bracelet to the backside and pull the inner cords through the loops formed in Step 07 and Step 08.

Tighten the loops and knots firmly.
Hold the buckle and pull on the ends to get a result as shown in the picture.

Cut and singe the ends.

The finished bracelet.

Feel free to post pictures of your results or leave some feedback !
Happy knotting.
What is the formula for determining the length of cord needed for different size wrists?
ReplyDeleteHi Ernest, I don't think there's a reliable formula. It depends on how firm you tighten your knots, how thick your weave is and the size of your clip. I always measure it by tying a few inch of the weave, then measure how much cord was used. If you already have some numbers, you could use cross-multiplication.
ReplyDelete